# Creating a Custom Pass
To create a Custom Pass, add a Custom Pass Volume component to your scene using **GameObject > Volume > Custom Pass.** This creates a GameObject called Custom Pass which includes the **Custom Pass Volume** component. You can use this component to create and configure Custom Passes.
## Custom Pass Volume component properties

| **Property** | **Description** |
| --------------- | ------------------------------------------------------------ |
| Mode | Use the drop-down to select the method that Unity uses to determine whether this Custom Pass Volume can affect a Camera:
• **Global**: The Custom Pass Volume has no boundaries, and it can affect every Camera in the scene.
• **Local**: Allows you to specify boundaries for the Custom Pass Volume so that it only affects Cameras inside the boundaries. To set the boundaries, add a [Collider](https://docs.unity3d.com/Manual/CollidersOverview.html) to the Custom Pass Volume's GameObject. |
| Injection point | Use the drop-down to define when Unity executes this Custom Pass in the HDRP render loop.
For more information about each injection point, see [**Injection Points**](#Injection Points.md) |
| Priority | If you have more than one Custom Pass Volume assigned to the same injection point, use this property to control the order that Unity executes them in.
Unity executes these Volumes in order of Priority, starting with 0. |
| Fade Radius | Define when Unity starts to fade in the effect of the Custom Pass as you approach the Volume.
A value of 0 means HDRP applies this Volume’s effect immediately at the edge of the Volume. A high value means the effect starts to appear far away from the Volume.
This property only appears when **Mode** is set to **Local**. |
| Custom Passes | Click the Add (**+**) button to create a Custom Pass. The Custom Pass Volume component has the following types of Custom Passes available by default:
**• FullScreen Custom Pass**: Use this to execute an effect that Unity applies to the Camera view or stores in the Custom Pass buffer. For more information, see [Full-screen Custom Pass](#Full-Screen-Custom-Pass).
**• DrawRenderers Custom Pass**: Use this to apply a Custom Pass to GameObjects that are in the Camera view. For more information, see [Draw renderers custom pass](#Draw-Renderers-Custom-Pass).
If you create your own Custom Pass, it also appears in this drop-down. For more information, see [Scripting your own Custom Pass in C#](Custom-Pass-Scripting.md).
If there are one or more Custom Passes in this component, you can click `**-**` to delete one. |
## Full-screen Custom Pass
A full-screen Custom Pass applies an effect to the whole screen. To achieve this, it renders a full-screen quad using a material that is configured for use with a full-screen Custom Pass, and executes a fragment shader for every pixel on the screen.
To create a full-screen Custom Pass, click the Add (**+**) button at the bottom right of the [**Custom Pass Volume**](#Custom-Pass-Volume) component and select **FullScreeenCustomPass**.
### FullScreenCustomPass properties
You can configure a full-screen Custom Pass in the **Custom Passes** panel using the following properties:

| **Property** | **Description** |
| ------------------- | ------------------------------------------------------------ |
| Name | Use this field to name this Custom Pass. Unity uses this name to refer to this Custom Pass Volume in the [Profiler](https://docs.unity3d.com/Manual/Profiler.html). |
| Target Color Buffer | Select the buffer that Unity writes the color data to:
**Camera:** Targets the current camera color buffer that renders the Custom Pass.
**Custom:** Uses the Custom Pass Buffer allocated in the HDRP asset.
**None:** Doesn’t write the data to a buffer.
You cannot write color data to the Camera color buffer if you have **Fetch Color Buffer** enabled.
When the Target Color Buffer and The Target Buffer are both set to **None** Unity does not execute a Custom Pass because there is no buffer to render to. |
| Target Depth Buffer | Select the buffer where Unity writes and tests the depth and stencil data.
This buffer does not contain transparent objects that have **Depth Write** enabled in the [shader properties](https://docs.unity3d.com/Packages/com.unity.render-pipelines.high-definition@latest?/manual/Lit-Shader.html).
When the Target Color Buffer and The Target Buffer are both set to **None** Unity does not execute a Custom Pass because there is no buffer to render to. |
| Clear Flags | A clear flag discards the contents of a buffer before Unity executes this Custom Pass.
This property assigns a clear flag to one of the following buffers:
**None:** Doesn’t clear any buffers in this pass.
**Color:** Clears the depth buffer.
**Depth:** Clears the depth buffer and the stencil buffer.
**All:** Clears the data in the color, depth, and stencil buffers. |
| Fetch Color Buffer | Enable this checkbox to allow this Custom Pass to read data from the color buffer.
This applies even when [Multisampling anti-aliasing (MSAA)](https://docs.unity3d.com/Packages/com.unity.render-pipelines.high-definition@latest?/manual/MSAA.html) is enabled.
When **Fetch Color Buffer** and MSAA are enabled, it forces the color buffer to resolve, and the Custom Pass uses one of the following injection points:
Before PreRefraction
Before Transparent
After Opaque Depth And Normal
A Custom Pass can’t read and write to the same render target. This means that you can’t enable **Fetch Color Buffer** and use **Target Color Buffer** at the same time. |
| FullScreen Material | The material this Custom Pass renders in your scene. |
| Pass Name | Select the shader [Pass name](https://docs.unity3d.com/Manual/SL-Pass.html) that Unity uses to draw the full-screen quad. |
### Creating a material to use with a full-screen Custom Pass
To use a full-screen Custom Pass, you need to create a shader for your Custom Pass to use in your scene. There is a specific type of shader in Unity for full-screen Custom Passes. To create a compatible shader:
1. Create a full-screen Custom Pass shader. To do this, go to **Assets >** **Create > Shader > HDRP > Custom FullScreen Pass.**
2. Go to the **Hierarchy** and right click on the **Custom FullScreen Pass** shader, then select **Create > Material.** Unity creates a new material with the prefix “FullScreen_”.
3. In the Custom Pass component, Click `**+**` to create a Custom Pass and select **FullScreenCustomPass.**
4. To assign this material to your **FullScreenCustomPass,** open the material picker using the icon at the right of the **FullScreen Material** box and select your “FullScreen_...” material.
5. If you have multiple Custom Passes, select the **Pass Name** you would like this pass to use.
### Editing the Unity shader for a full-screen Custom Pass
When Unity creates a material for use with a full-screen Custom Pass, it adds default template code for a Unity shader.
To edit the Unity shader:
1. Select the material in the **Assets** window.
2. Navigate to the **Inspector**
3. Click **Open**.
This Unity shader source file contains the following `FullScreenPass` method. You can add custom shader code for your full-screen Custom Pass here:
```c#
float4 FullScreenPass(Varyings varyings) : SV_Target
{
float depth = LoadCameraDepth(varyings.positionCS.xy);
PositionInputs posInput = GetPositionInput(varyings.positionCS.xy, _ScreenSize.zw, depth, UNITY_MATRIX_I_VP, UNITY_MATRIX_V);
float3 viewDirection = GetWorldSpaceNormalizeViewDir(posInput.positionWS);
float4 color = float4(0.0, 0.0, 0.0, 0.0);
// Load the camera color buffer at the mip 0 if not currently in the BeforeRendering injection point
if (_CustomPassInjectionPoint != CUSTOMPASSINJECTIONPOINT_BEFORE_RENDERING)
color = float4(CustomPassLoadCameraColor(varyings.positionCS.xy, 0), 1);
// Add your custom pass code here
// Fade value allows you to increase the strength of the effect while the camera gets closer to the custom pass volume
float f = 1 - abs(_FadeValue * 2 - 1);
return float4(color.rgb + f, color.a);
}
```
The FullScreenPass method fetches the following input data:
- Depth
- View direction
- Position in world space
- Color
The `FullScreenPass` method also contains the `_FadeValue` variable, which allows you to increase the strength of an effect as the Camera gets closer to the Custom Pass Volume. This variable only works on local Custom Pass Volumes that have a **Fade Radius** assigned.
## Draw renderers Custom Pass
You can use a draw renderers Custom Pass to apply an effect to GameObjects that are in the Camera’s view.
You can also use this Custom Pass to apply an effect to objects outside of the camera’s view using the options in the **Culling Mask** drop-down property in the [HD Camera](https://docs.unity3d.com/Packages/com.unity.render-pipelines.high-definition@7.1/manual/HDRP-Camera.html) component.
To create a draw renderers Custom Pass, click the Add (**+**) button in the [**Custom Pass Volume**](#Custom-Pass-Volume) component and select **DrawRenderersCustomPass**.
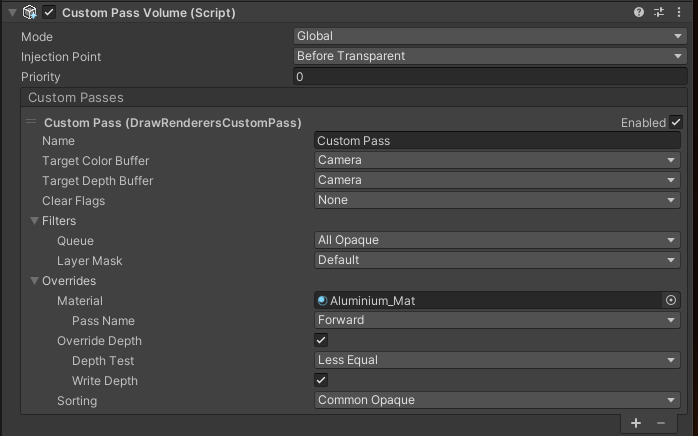
### Draw renderers Custom Pass properties
You can configure a draw renderers Custom Pass in the **Custom Passes** panel using the following properties:
| **Property** | **Description** |
| ------------------- | ------------------------------------------------------------ |
| Name | Use this field to name this Custom Pass. Unity uses this as the name of the profiling marker for debugging. |
| Target Color Buffer | Select the buffer that Unity writes the color data to:
**Camera:** Targets the current camera color buffer that renders the Custom Pass.
**Custom:** Uses the Custom Pass buffer allocated in the HDRP Asset.
**None:** Doesn’t write the data to a buffer. |
| Target Depth Buffer | The target buffer where Unity writes and tests the depth and stencil data:
**Camera:** Targets the current camera depth buffer that renders the Custom Pass.
**Custom:** Uses the Custom Pass buffer allocated in the HDRP Asset.
**None:** Doesn’t write the data to a buffer.
This buffer does not contain transparent objects that have **Depth Write** enabled in the [shader properties](https://docs.unity3d.com/Packages/com.unity.render-pipelines.high-definition@10.2/manual/Lit-Shader.html). |
| Clear Flags | A clear flag discards the contents of a buffer before Unity executes this Custom Pass.
This property assigns a clear flag to one of the following buffers:
**None:** Doesn’t clear any buffers in this pass.
**Color:** Clears the depth buffer.
**Depth:** Clears the depth buffer and the stencil buffer.
**All:** Clears the data in the color, depth and stencil buffers. |
| Filters | This section determines the GameObjects that Unity renders in this Custom Pass. |
|Queue | Select the kind of materials that this Custom Pass renders. |
| Layer Mask |Select the GameObject layer that this Custom Pass applies to. |
| Overrides | |
| Material |Select the material that this Custom Pass Volume uses to override the material of everything included in this Custom Pass.
This field accepts an unlit Shader Graph, unlit HDRP Unity shader or lit shader. For a full list of compatible materials, see [Material and injection point compatibility](#Material-Injection-Point-Compatibility).
You can create a Unity shader that is compatible with a draw renderers Custom Pass using **Create > Shader > HDRP > Custom Renderers Pass** in the menu. |
| Pass Name | This field appears when you assign a material to the **Material** field. The drop-down options for this field change depending on the material you assigned to the **Material** field.
Select the Custom Pass that Unity uses to draw the full-screen quad. You can use this to switch between multiple Custom Pass effects. |
|Override Depth |Enable this checkbox to override the depth render state in the materials of the rendered GameObjects.
This allows you to replace the default **Depth Test** value, and write the depth using custom values. |
|Depth Test | When Unity renders an GameObjects, it uses the **Depth Test** value to check if it is behind another object. To do this, Unity tests the z-value (the depth) of a given GameObject’s pixel, and compares it against a value stored in the depth buffer.
By default, **Depth Test** is set to **Less Equal**, allowing the original object to appear in front of the object it is tested against. Use the drop-down to select the comparison method to use for the depth test. Each comparison method changes how the Shader renders:
**Disabled**: Do not perform a depth test.
**Never**: The depth test never passes.
**Less**: The depth test passes if the pixel's z-value is less than the stored value.
**Equal**: The depth test passes if the pixel's z-value is equal to the stored value.
**Less Equa**l: The depth test passes if the pixel's z-value is less than or equal than the Z-buffers value. This renders the tested pixel in front of the other.
**Greater**: The depth test passes if the pixel's z-value is greater than the stored value.
**Not Equa**l: The depth test passes if the pixel's z-value is not equal to the stored value.
**Greater Equa**l: The depth test passes if the pixel's z-value is greater than or equal to the stored value.
**Always**: The depth test always passes, there is no comparison to the stored value.This setting only appears when you enable **Override Depth**. |
|Write Depth |Enable **Write Depth** to instruct Unity to write depth values for GameObjects that use this material.
Disable it if you do not want Unity to write depth values for each GameObject. |
| Sorting | Select the way Unity sorts the GameObjects in your scene before it renders them.
For more information, see [Sorting criteria](https://docs.unity3d.com/ScriptReference/Rendering.SortingCriteria.html). |
### ForwardOnly support
Unity uses the **Pass Name** to select which pass of the shader it renders on an HDRP material. To render the object color, select **Forward** or **ForwardOnly**. Use the **DepthForwardOnly** Pass Name if you only want to render the depth of the object.
If you see the following warning when you create a new draw renderers CustomPass, this might be due to your [HDRP Asset](https://docs.unity3d.com/Packages/com.unity.render-pipelines.high-definition@10.3/manual/HDRP-Asset.html) settings:

To fix this, navigate to your HDRP Asset in your **Assets** folder (if you are using the HDRP template, this is in **Assets > Settings**) and change the **Lit Shader Mode** to **Both**. For more information, see [Changing the depth of a renderer in your scene](#Changing-Renderer-Depth).
### Material and injection point compatibility
[Injection Points](Custom-Pass-Injection-Points.md) determine when Unity executes a Custom Pass Volume in the render loop.
However, not all materials are supported by every injection point in a draw renderers Custom Pass. The following table lists the materials that each injection point supports for a draw renderers Custom Pass:
| **Injection Point** | **Material Type(s) supported** |
| ----------------------------- | ----------------------------------------------------- |
| Before Rendering | Unlit forward but without writing to the Camera color |
| After Opaque Depth And Normal | Unlit forward |
| Before PreRefraction | Unlit and Lit forward only |
| Before Transparent | Unlit and Lit forward only with refraction |
| Before Post Process | Unlit and Lit forward only with refraction |
| After Post Process | Unlit and Lit forward only with refraction |
When Unity renders a material that is not supported by the current injection point, it results in an undefined behavior. For example, rendering GameObjects with lit shaders in the **After Opaque Depth And Normal** injection point produces unexpected results.
## Custom Renderers Pass shader
You can create advanced Custom Pass effects using a Custom Renderers Pass shader. To create this shader, navigate to **Assets > Create > Shader > HDRP > Custom Renderers Pass**. This creates an unlit HDRP shader named **New Renderers CustomPass**. This Unity shader has one ShaderLab pass.
### Using a Custom Renderers Pass shader to create advanced effects
HDRP includes a specific shader structure to store the data that the render pipeline uses to render materials in your scene. The Fragment shader code section describes these structures.
### Fragment shader code
To write fragment shader code in the Custom Renderers Pass shader, use the `GetSurfaceAndBuiltinData` method.
This method accepts the following inputs:
1. A `FragInputs` structure that contains all the geometry inputs passed into the fragment shader. For information about the properties in this structure, see [FragInput](#Fraginputs).
2. A `float3` that contains the current pixel's view direction.
3. A `PositionInputs` structure that contains position-based utility properties you might require in your shader. For information about the properties in this structure, see [PositionInputs](#PositionInputs).
The `GetSurfaceAndBuiltinData` method does not use `return` to output results. Instead, it has two parameters that use the [out](https://docs.microsoft.com/en-us/dotnet/csharp/language-reference/keywords/out-parameter-modifier) modifier. The reason for this is to support different outputs depending on the shader's surface type. The outputs are:
1. A `SurfaceData` structure that contains the final color. For information about the properties in this structure, see [SurfaceData](#SurfaceData).
2. A `BuiltinData` structure that contains additional information that HDRP can use to calculate particular effects. For information about the properties in this structure, see [BuiltinData](#BuiltinData).
The following example demonstrates how to use the `GetSurfaceAndBuiltinData` method to write fragment shader code. This example samples the color of the `_ColorMap` texture, uses the alpha channel to perform an alpha test, then outputs the texture color for the surface:
```c#
// Put the code to render the GameObjects in your Custom Pass in this method
void GetSurfaceAndBuiltinData(FragInputs fragInputs, float3 viewDirection, inout PositionInputs posInput, out SurfaceData surfaceData, out BuiltinData builtinData)
{
float2 colorMapUv = TRANSFORM_TEX(fragInputs.texCoord0.xy, _ColorMap);
float4 result = SAMPLE_TEXTURE2D(_ColorMap, s_trilinear_clamp_sampler, colorMapUv) * _Color;
float opacity = result.a;
float3 color = result.rgb;
#ifdef _ALPHATEST_ON
DoAlphaTest(opacity, _AlphaCutoff);
#endif
// Write back the data to the output structures
ZERO_INITIALIZE(BuiltinData, builtinData); // No call to InitBuiltinData as we don't have any lighting
builtinData.opacity = opacity;
builtinData.emissiveColor = float3(0, 0, 0);
surfaceData.color = color;
}
```
#### FragInputs
`FragInputs` is a structure that stores all the geometry inputs passed to the fragment stage:
```c#
struct FragInputs
{
float4 positionSS; // In case depth offset is use, positionRWS.w is equal to depth offset
float3 positionRWS; // Relative camera space position
float4 texCoord0; // UV0
float4 texCoord1; // UV1
float4 texCoord2; // UV2
float4 texCoord3; // UV3
float4 color; // vertex color
float3x3 tangentToWorld;
bool isFrontFace;
};
```
#### PositionInputs
`PositionInputs` provides another set of properties you may need to use in your shaders. You can think of it as a utility structure to access position-related properties. The depth comes from the current camera depth buffer and `tileCoord` is not available (it’s only used in compute shaders):
```c#
struct PositionInputs
{
float3 positionWS; // World space position (could be camera-relative)
float2 positionNDC; // Normalized screen coordinates within the viewport : [0, 1) (with the half-pixel offset)
uint2 positionSS; // Screen space pixel coordinates : [0, NumPixels)
uint2 tileCoord; // Screen tile coordinates : [0, NumTiles)
float deviceDepth; // Depth from the depth buffer : [0, 1] (typically reversed)
float linearDepth; // View space Z coordinate : [Near, Far]
};
```
#### SurfaceData
The `SurfaceData` structure allows you to set the color of an object’s surface. It has a different representation for each material type. For an unlit shader, it only includes a single field that represents the color of the unlit object:
```c#
struct SurfaceData
{
float3 color;
};
```
#### BuiltinData
The `BuiltinData` structure contains additional information you can pass on to HDRP:
```c#
struct BuiltinData
{
real opacity; // Translucency of your object
real alphaClipTreshold; // The threshold for alpha clipping
real3 bakeDiffuseLighting;
real3 backBakeDiffuseLighting;
real shadowMask0;
real shadowMask1;
real shadowMask2;
real shadowMask3;
real3 emissiveColor; // Emissive color
real2 motionVector; // Not yet supported
real2 distortion; // Distortion vector
real distortionBlur; // Distortion blur level [0, 1]
uint renderingLayers;
float depthOffset; // Depth offset
real4 vtPackedFeedback;
};
```
### Vertex shader code
To write vertex shader code in the Custom Renderers Pass shader, use the ApplyMeshModification method . By default, the shader comments this method out, so to use it, remove the comment slashes (//). You can use this method to add vertex deformation or vertex animation to your Unity shader.
For its input, this method takes:
1. An AttributeMesh structure that contains the current vertex and its properties. For information about the properties in this structure, and which defines they map to, see [AttributeMesh](#AtrributeMesh).
2. A float3 that contains the current `timeParameters`. In this float, the **x** value refers to time in seconds, the **y** value is sin(x) and the **z** value is cos(x).
For its output, this method returns an `AttributeMesh` that represents the modified vertex. The usual workflow is to modify the input `AttributeMesh` and return that.
Note that transformations in this method are in object space. If you want to apply transformations in world space:
1. Convert the object space data to world space. Use the `TransformObjectToWorld` method to convert position data and `TransformObjectToWorldDir` to convert normal data.
2. Apply the transformations.
3. Convert the world space data back to object space. Use the `TransformWorldToObject` method to convert position data and `TransformWorldToObjectDir` to convert normal data.
For an example on how to use this method to write vertex shader code, see the following code sample. This example modifies the vertex data to slightly enlarge the mesh and avoid z-fighting:
```c#
#define HAVE_MESH_MODIFICATION
AttributesMesh ApplyMeshModification(AttributesMesh input, float3 timeParameters)
{
input.positionOS += input.normalOS * 0.0001; // Enlarges the mesh slightly to avoid z-fighting.
return input;
}
```
#### AtrributeMesh
The `AttributesMesh` structure has the following definitions:
```c#
struct AttributesMesh
{
float3 positionOS : POSITION;
float3 normalOS : NORMAL;
float4 tangentOS : TANGENT; // Store sign in w
float2 uv0 : TEXCOORD0;
float2 uv1 : TEXCOORD1;
float2 uv2 : TEXCOORD2;
float2 uv3 : TEXCOORD3;
float4 color : COLOR;
};
```
### Sampling UVs in the fragment shader
Unity uses the following defines to send data to the vertex and fragment shaders:
- `ATTRIBUTES_NEED_TEXCOORD0`
- `VARYINGS_NEED_TEXCOORD0`
You can use the `ATTRIBUTES_NEED` and `VARYINGS_NEED` systems to determine what data Unity sends to the vertex and fragment shader. `ATTRIBUTES_NEED` controls the vertex data and `VARYINGS_NEED` controls the fragment data. You can control this data using the following list of defines:
```c#
#define ATTRIBUTES_NEED_NORMAL
#define ATTRIBUTES_NEED_TANGENT
#define ATTRIBUTES_NEED_TEXCOORD0
#define ATTRIBUTES_NEED_TEXCOORD1
#define ATTRIBUTES_NEED_TEXCOORD2
#define ATTRIBUTES_NEED_TEXCOORD3
#define ATTRIBUTES_NEED_COLOR
#define VARYINGS_NEED_POSITION_WS
#define VARYINGS_NEED_TANGENT_TO_WORLD
#define VARYINGS_NEED_TEXCOORD0
#define VARYINGS_NEED_TEXCOORD1
#define VARYINGS_NEED_TEXCOORD2
#define VARYINGS_NEED_TEXCOORD3
#define VARYINGS_NEED_COLOR
#define VARYINGS_NEED_CULLFACE
```
You can access UV 0 and normals by default using `ATTRIBUTES_NEED_TEXCOORD0` and `ATTRIBUTES_NEED_NORMAL`.
### Changing the depth of a renderer in your scene
You can override the depth state of any renderer component in your Custom Pass. This replaces the depth states of the GameObjects rendered in your scene with the depth render states assigned in the [Custom Pass Volume](#Custom-Pass-Volume) component. You might want to use this to make some GameObjects in your scene invisible in a Custom Pass.
You can also use this method to render GameObjects in a Custom Pass that are not in the camera culling mask. Unity renders opaque GameObjects that are not in the Camera [Culling Mask](https://docs.unity3d.com/Packages/com.unity.render-pipelines.high-definition@10.2/manual/HDRP-Camera.html) in the **Equal** depth test. You can only change the depth state of a renderer if the GameObject is in the depth buffer. To include these opaque GameObjects in the depth buffer, go to the Custom Pass Volume component and set the **Depth Test** property to **Less Equal**.
Unity renders all objects in a Custom Pass using the Forward rendering path**.** This can cause issues if your scene is set to render using **Deferred Only**. In the [**HDRP Asset**](https://docs.unity3d.com/Packages/com.unity.render-pipelines.high-definition@10.3/manual/HDRP-Asset.html), change the **Lit Shader Mode** to **Both** to avoid issues when you build your project.
### Using a Custom Buffer Format
You can use custom buffers to store the result of your passes to execute later in the rendering process, or between two Custom Passes. You can sample these custom buffers in any kind of Custom Pass shader.
For a draw renderer Custom Pass, Unity sets the target buffers to the camera buffers by default, but you can select a custom buffer instead. To use a **Custom Buffer Format** you need a HDRP Asset in your scene. If you have created a HDRP template scene, there is an HDRP asset named **HRenderPipelineAsset** in **Assets > Settings.** Otherwise, follow the instructions in [HDRP Asset](https://docs.unity3d.com/Packages/com.unity.render-pipelines.high-definition@10.3/manual/HDRP-Asset.html) to create a new HDRP Asset for your scene.
To change the **Buffer Format** of the Custom Pass component in your HDRP Asset, go to **Rendering > Custom Pass > Custom Buffer Format**.

You can also disable Custom Passes in the HDRP asset; to do this, disable the **Custom Pass** property. This automatically disables the custom buffer allocation. You can also choose whether or not to render Custom Passes in the frame settings. This does not affect the custom buffer allocation.